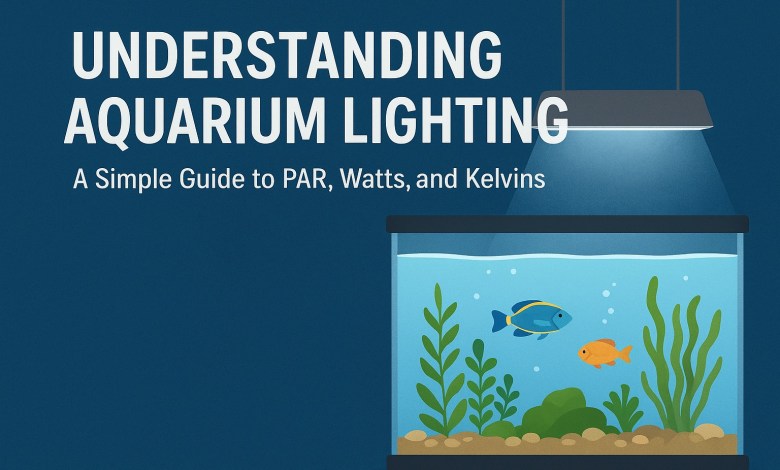
Understanding Aquarium Lighting: A Simple Guide to PAR, Watts, and Kelvins
For the new aquarist, few experiences are as confusing as standing before the wall of aquarium lights at a local fish store. The boxes are a dizzying mix of numbers, acronyms, and technical jargon. PAR, Lumens, Kelvin, Watts—that can make the simple goal of lighting a fish tank feel like an exercise in advanced physics. This feeling of intimidation is common, but it doesn’t have to be the final word.
Also Read-10 Easiest Live Plants for a Low-Tech Beginner Aquarium
This guide is designed to turn that confusion into confidence, breaking down the essential concepts of aquarium lighting into simple, understandable terms. The mission here is not just to help you buy a light, but to help you create a vibrant, living ecosystem where both your fish and plants flourish. The right light is arguably the single most important piece of equipment for achieving this vision, acting as the very heart of your underwater world.
The Heart of Your Underwater World: Why Lighting Matters.
At its most basic level, an aquarium light allows you to see and enjoy your fish. But its true role is far more important. Proper lighting is the fundamental energy source that powers the entire aquatic ecosystem you are creating, influencing everything from water quality to the health and behavior of your tank’s inhabitants.
The Engine of Life: Photosynthesis Explained.
For a planted aquarium, the light fixture is the engine of life. Aquatic plants, like their terrestrial counterparts, perform an important process called photosynthesis. Think of your aquarium light as the “food” that allows your plants to function. They absorb this light energy, “breathe in” the carbon dioxide (CO2) that your fish exhale, and in return, they “exhale” life-giving oxygen into the water. This process is critical for maintaining a healthy and stable environment. The oxygen produced is essential for fish respiration, while the consumption of waste products helps keep the water clean.
This relationship creates a powerful, self-sustaining cycle. Proper lighting doesn’t just help plants and fish independently; it creates a relationship where each element supports the others. A well-lit plant becomes an efficient, oxygen-producing, waste-consuming biological filter. The improved water quality and higher oxygen levels directly benefit the fish, reducing their stress. In turn, healthy fish produce waste, which acts as a natural fertilizer for the plants. Therefore, the light fixture is not just a component; it is the engine of this symbiotic relationship. By investing in a good light, a beginner is investing in the overall stability and health of their entire miniature ecosystem.
Keeping Time for Your Fish: The Circadian Rhythm.
Beyond its role in photosynthesis, a consistent lighting schedule is vital for the well-being of your fish. Like humans, fish have an internal clock, or circadian rhythm, that regulates their daily activities. A reliable day-night cycle, provided by a controlled light source, mimics their natural environment and helps manage their feeding, breeding, and sleeping patterns. This predictable routine significantly reduces stress, which is a major factor in fish health and disease prevention. A reliable light schedule is, therefore, as important for your fish as it is for your plants.
Aesthetic Impact.
Finally, the quality of your aquarium light has a big impact on the visual appeal of your tank. The right light spectrum can make the colors of your fish and plants appear more vibrant and natural, transforming a simple glass box into a stunning underwater display. Advanced lights with red, green, and blue (RGB) diodes are particularly effective at enhancing the rich reds, lush greens, and shimmering blues of your aquatic life, making the entire aquascape “pop”.
A Beginner’s Guide to PAR, Kelvins, and Watts.
The technical specifications on a lighting box can be the most confusing part for a new hobbyist. However, you only need to understand three key metrics to make an informed decision. By focusing on what each number actually means for your plants and your viewing experience, you can confidently choose the right light for your goals.
PAR (Photosynthetically Active Radiation): The Plant’s Perspective.
Of all the numbers associated with aquarium lighting, PAR is the most important for anyone who wants to grow healthy plants. PAR is a measure of the actual, usable light energy that plants require to perform photosynthesis. It measures the number of light particles (photons) within the specific color spectrum that plants can absorb, ranging from 400 to 700 nanometers.
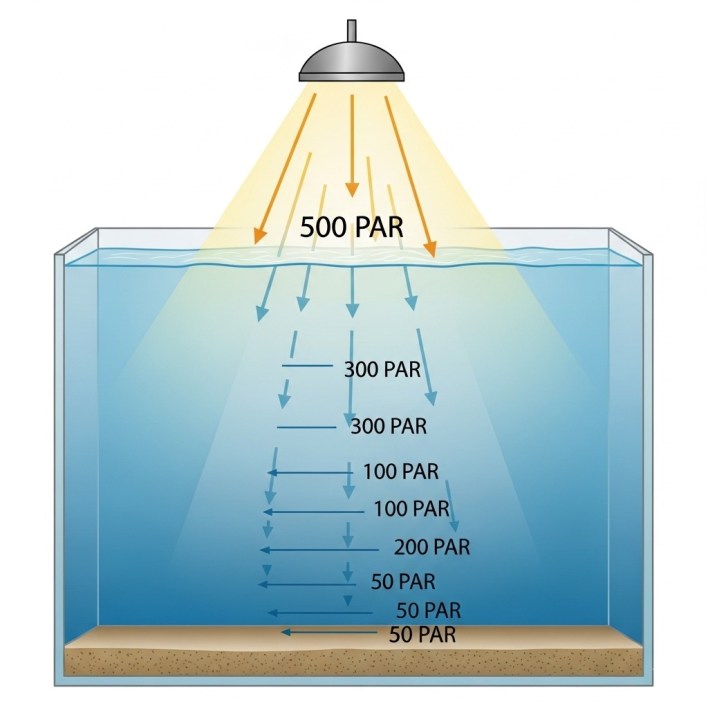
To simplify this, think of light as a meal for your plants. Other metrics, like Lumens, might tell you how bright the plate of food looks to you, but PAR tells you the actual calorie count—the real nutritional value your plants are receiving. A light can appear very bright to the human eye but have a very low PAR value, making it completely useless for growing plants. It is also critical to understand that PAR values decrease significantly as light travels through water; the deeper the tank, the less light reaches the bottom. Therefore, the PAR value measured at the substrate (the bottom of the tank) is the most important figure to consider.
Kelvins (K): The Aesthetic Choice.
While PAR is about plant health, the Kelvin (K) rating is about human aesthetics. Kelvin describes the “color temperature” of the light, which determines the overall visual appearance and mood of your aquarium.

Kelvin is the mood lighting for your aquatic masterpiece. A low Kelvin rating, such as 2700K, produces a warm, yellowish glow similar to an old incandescent bulb. A very high Kelvin rating, like 10,000K or more, produces a crisp, cool, and distinctly blueish light, often preferred for saltwater reef tanks to mimic deep-water conditions. For a freshwater planted aquarium, the sweet spot is a neutral white light in the range of 5,500K to 7,500K. This range closely approximates natural daylight, making both fish and plants appear vibrant and true to their natural colors.
Watts and the “Watts-Per-Gallon” Myth.
A Watt (W) is simply a unit of energy consumption; it measures how much electricity a light fixture uses, not how much light it produces or what the quality of that light is. This distinction is critical because it leads to one of the most persistent and misleading myths in the aquarium hobby: the “watts-per-gallon” rule.
This rule of thumb originated in an era dominated by inefficient fluorescent lighting, where most bulbs had a roughly similar, and poor, level of efficiency. Under those conditions, using watts as a proxy for light output was a crude but somewhat functional guideline. With the advent of modern, highly efficient LED technology, this rule is now completely outdated and misleading.
The reason this old rule fails is due to what can be called the “efficiency gap.” The core assumption of the watts-per-gallon rule was that power consumption (Watts) was directly correlated to usable light output. However, modern LEDs have created a massive gap between these two metrics. The efficiency with which different LED fixtures convert electricity into usable plant energy (PAR) varies enormously. One manufacturer’s 20W LED might be engineered to produce a very high PAR value, while another’s 40W LED could be poorly designed, wasting much of its energy as heat and producing very low PAR. A beginner who follows the outdated rule could easily purchase a high-wattage, low-PAR fixture and be left wondering why their plants are failing, leading to frustration. To succeed, one must ignore the watts-per-gallon rule and focus instead on the metric that truly matters for plants: PAR.
Why LED is the Best Light for Aquarium Plants.
When setting up a new aquarium, especially one with live plants, the choice of lighting technology is clear. LED (Light Emitting Diode) lighting has become much better than older options like fluorescent and metal halide lamps to such a degree that it is the only option a beginner should seriously consider. Its superiority is built on four key pillars.
The Four Pillars of LED Superiority.
- Energy Efficiency: LEDs are masters of converting electricity into light. They produce brilliant illumination while consuming significantly less power than their predecessors, which translates directly to lower monthly electricity bills.
- Longevity: The lifespan of a quality LED fixture is remarkable, often rated for 50,000 hours or more. For the average aquarist, this can mean over a decade of use without needing a replacement. This is a stark contrast to fluorescent bulbs, which require replacement every one to two years to maintain their optimal light spectrum and intensity.
- Minimal Heat Output: Older lighting technologies, particularly metal halides, were notorious for generating significant heat that could dangerously raise the aquarium’s water temperature. LEDs, however, run remarkably cool, transferring very little heat into the water. This creates a more stable and safe environment for fish and eliminates the potential need for expensive cooling equipment.
- Great Control and Customization: The digital nature of LEDs allows for a level of control that was once unimaginable. Many modern LED fixtures feature built-in dimmers, programmable 24-hour schedules, and full RGB (Red, Green, Blue) spectrum control. This allows hobbyists to fine-tune the light’s intensity to prevent algae, customize the color spectrum to enhance the appearance of their fish, and automate a natural sunrise and sunset cycle.
Beyond just cost savings, the longevity of LEDs provides a crucial, often overlooked, benefit: environmental stability. Fluorescent bulbs do not simply burn out; their light spectrum degrades over time in a process called “color shift,” often becoming more yellow. This gradual, often unnoticed change in the primary energy source can stress plants, which are adapted to a specific spectrum, and create conditions that give opportunistic algae an advantage. Because LEDs maintain a consistent and stable light spectrum for many years, they remove a major variable from the complex equation of balancing an aquarium. This stability makes it far easier for a beginner to manage their tank and diagnose other potential issues without having to wonder if an aging bulb is the culprit.
Your Practical Aquarium Lighting Guide for Easy Plants.
With the theory understood, it’s time to put it into practice. This section provides actionable steps and clear goals for setting up a successful planted aquarium with easy-to-grow plants, ensuring a rewarding first experience.
Choosing Your First LED Light.
For a beginner, the single most important feature to look for in an entry-level LED light is dimmability. The ability to adjust the light’s intensity is a very useful tool. It allows you to start with a lower light level, which is the best way to prevent algae outbreaks while your new plants are adapting and the tank’s ecosystem is maturing. Many reputable and affordable brands offer excellent options for beginners. Models like the Nicrew ClassicLED, programmable lights from Hygger, or the Fluval Plant Nano LED are well-regarded for providing the features and performance needed to grow low-light plants successfully without a hefty price tag.
Low-Light Plants for Guaranteed Success.
To build confidence and ensure a positive outcome, it is best to start with plants known for their hardiness and low light requirements. These species are beautiful, widely available, and will thrive in conditions that are easy for a beginner to create and maintain.
- Excellent Beginner Plant Choices: Anubias (especially Anubias nana), Java Fern, various Cryptocoryne species (C. wendtii, C. lutea), and Java Moss.
Hitting the Target: A Simple PAR Goal.
For the low-light plants listed above, the goal is to achieve a PAR value of 15-30 micromoles (µmol) at the substrate level. While most beginners will not have access to a PAR meter to measure this directly, it is possible to approximate this range effectively. By choosing a reputable light designed for planted aquariums and using its dimmer function to start at a low intensity—typically around 30% to 50% of its maximum power—you can create an environment that falls safely within this low-light range.
Plant Lighting Requirements at a Glance.
This table serves as a quick-reference guide to connect lighting levels with the practical settings and plants appropriate for each. For beginners, focusing entirely on the “Low” light category is the recommended path to success.
| Light Level | PAR at Substrate (µmol) | Recommended Photoperiod | Example Beginner Plants |
|---|---|---|---|
| Low | 15-30 | 6-8 Hours | Anubias, Java Fern, Cryptocoryne, Mosses |
| Medium | 30-50 | 8-10 Hours | Amazon Sword, Water Wisteria, Dwarf Sagittaria |
| High | 50+ | 8-10 Hours (CO2 often required) | Rotala Wallichii, Dwarf Baby Tears, Monte Carlo |
The Critical Role of an Aquarium Light Timer.
An aquarium light timer is not an optional accessory; it is an essential piece of equipment for any planted aquarium, and it is especially critical for beginners. It is the key to providing the consistency that a healthy aquatic ecosystem demands.

Why Consistency is King.
Both plants and fish thrive on routine. A timer provides a perfectly consistent day/night cycle that manual on/off control can never hope to match. This reliability removes a major source of environmental stress, promoting better health for all of your tank’s inhabitants. This automation ensures your aquarium’s schedule is maintained perfectly, even when you are busy, away on vacation, or simply forget.
Your Best Weapon Against Algae.
Inconsistency and excess light are two of the primary triggers for algae blooms. By ensuring the light turns on and off at the same time every day for a set duration, a timer eliminates both of these triggers, making it the single most effective preventative measure against algae.

Setting Your Photoperiod (Light Duration).
For a newly set up planted aquarium, a conservative starting point is best. Set your timer for a daily photoperiod of 6 to 8 hours. This provides ample light for low-light plants to photosynthesize without providing excess energy that could fuel an algae outbreak. Adopting a “start low, go slow” approach is wise; if your plants are growing well and there is no sign of algae after several weeks, you can gradually increase the duration in 30-minute increments. It is crucial to never leave the aquarium light on 24/7. Plants require a period of complete darkness to perform respiration—a process analogous to sleeping—where they consume sugars and oxygen to fuel their metabolic processes. Denying them this dark period will stress the plants and give algae a significant advantage. Even gentle “moonlight” modes should be limited to an hour or two for viewing before a period of total darkness.
Timers are available in several forms, from simple and inexpensive mechanical outlet timers to the sophisticated, fully programmable schedulers built into modern “smart” LED lights, which can be controlled via a mobile app.
The Algae Equation: Simple Troubleshooting for a Clear Tank.
The appearance of algae is the number one fear for most new aquarists. However, it is important not to panic. Algae is best understood as a helpful symptom, not a disease. Its presence is simply an indicator that the aquarium’s ecosystem is out of balance—most often, there is more light available than the plants can use with the available nutrients.
The Balance Beam: Light vs. Nutrients.
In a beginner’s low-tech planted tank (one without supplemental CO2 injection), the growth rate of plants is limited by the amount of available nutrients and carbon dioxide in the water. If you provide an intense level of light that the plants cannot fully utilize due to these limitations, the excess light energy will inevitably be consumed by algae, which is far more adaptable. For a beginner, the most straightforward and effective way to maintain this balance and control algae is to control the amount of light entering the system.
While advanced aquarists manage a complex balance of light, CO2, and fertilizers, a beginner’s system is much simpler. With no CO2 injection and minimal fertilizer use, two of the three main variables are relatively fixed and low. This leaves light as the primary and most easily manipulated control knob for the entire ecosystem. By learning to make small, patient adjustments to their light’s intensity and duration, a beginner can effectively manage the balance of their tank and prevent most common algae problems without needing to delve into complex water chemistry.
A Simple Troubleshooting Flowchart.
If algae does appear, follow this simple, methodical process to bring your tank back into balance. The golden rule is to make only one small adjustment at a time and wait at least a week to observe the results before making another change.
- Step 1: Observe the Type of Algae. Different types of algae can hint at the specific imbalance.
- Green Dust Algae (a film on the glass) often indicates that the light intensity is too high or the daily photoperiod is too long.
- Brown Diatom Algae (a dusty brown coating) is very common in new tanks as they cycle but can be a sign of low-intensity light in more established tanks.
- Green Hair Algae (long, thin threads) is a classic sign of too much light for the current nutrient levels.
- Step 2: Make ONE Lighting Adjustment. Do not change your feeding, water change, or fertilizing schedule. The first and easiest variable to adjust is always the light.
- Step 3: The Action Plan. Choose one of the following actions:
- Reduce the photoperiod by one hour. For example, if your timer is set for 8 hours, reduce it to 7 hours.
- OR, if your light is dimmable, reduce the intensity by 10-20%. For example, if it is running at 50% power, reduce it to 40%.
- Step 4: Wait and Watch. Algae will not disappear overnight. Maintain the new, lower light setting for at least one full week. Observe if the algae growth has slowed or stopped. If it has, you have found a better balance point for your tank. If it persists, you can make another small reduction.
Now You’ve Got This! Lighting the Way to Your Beautiful Aquarium.
Navigating the world of aquarium lighting can seem daunting at first, but by focusing on a few core principles, any beginner can achieve success. The journey from confusion to confidence is built on understanding not just what to buy, but why it matters. By remembering these key rules, you are well-equipped to create a thriving underwater world.
- Recap of the Golden Rules:
- Focus on PAR: This is the measurement of light that plants actually use. It is far more important than Watts or Lumens for growing a healthy underwater garden.
- Choose LED: Modern LED technology is the clear winner. It is more energy-efficient, longer-lasting, runs cooler, and offers superior control compared to any older lighting type.
- Use a Timer: Consistency is your secret weapon. An automated timer set for 6-8 hours a day provides the stability that healthy plants require and is your single best defense against algae.
By grasping these simple concepts, you have moved from being intimidated by the equipment to being in control of your aquatic environment. You now have the knowledge to select the right tool for the job and use it effectively. The beautiful, balanced, and vibrant aquarium you envisioned is now well within your reach.
Disclaimer:
The information provided in this article is for general informational and educational purposes only. All information is provided in good faith; however, we make no representation or warranty of any kind, express or implied, regarding the accuracy, adequacy, validity, reliability, availability, or completeness of any information. Under no circumstance shall we have any liability to you for any loss or damage of any kind incurred as a result of the use of the information or reliance on any information provided. Your use of the information and your reliance on any information is solely at your own risk. Always conduct your own research and consult with professionals before making any decisions related to your aquarium.


