Aquarium Filters Explained: A Beginner’s Guide to HOB, Sponge, and Canister Filters
Embarking on the journey of fishkeeping is a truly rewarding experience. As you set up your first aquarium, you will encounter a bewildering array of equipment, none more critical than the humble filter. For the uninitiated, a filter might seem like a simple water cleaner, a janitor for your glass box. This perception, however, is a profound understatement.
Also Read-7 Best Beginner Fish for a 10-Gallon Tank (That Aren’t Bettas)
The aquarium filter is not merely a cleaner; it is the primary life-support system for your aquatic pets. It functions as the heart, lungs, and liver of your miniature ecosystem, all rolled into one indispensable device. It circulates water like a heart, facilitates the crucial exchange of gases like the lungs, and, most importantly, processes and detoxifies waste, much like a liver. Understanding its true role is the first and most significant step towards becoming a successful aquarist.
To make an informed decision about which filter to purchase, one must first grasp the three fundamental processes that constitute comprehensive aquarium filtration. Most quality filters on the market, from simple internal models to complex external systems, are designed to perform these three functions, though they often excel in one or two areas over the others. These three processes are the pillars upon which a stable and healthy aquatic environment is built.
The Three Pillars of Filtration: A Foundational Trio.
Imagine water flowing through your filter. For it to emerge clean and safe for your fish, it must undergo a specific sequence of treatments. This sequence is universally acknowledged by experts and is critical for the filter’s long-term efficiency.
Pillar 1: Mechanical Filtration (The Sieve).
This is the most straightforward and intuitive type of filtration. Mechanical filtration is the physical process of straining solid particles and debris from the water as it passes through the filter media. Think of it as a strainer for your aquarium. Its primary job is to remove the visible contaminants that make the water look cloudy or dirty, such as fish excrement, leftover fish food, decaying plant leaves, and dust.
The materials used for this task, known as mechanical filter media, typically include sponges of varying pore sizes, fibrous pads, and polyester filter floss. A key principle for setting up effective mechanical filtration is to arrange the media in a coarse-to-fine sequence. This means the water first passes through a very porous sponge that traps large particles, then through a finer pad that catches smaller debris. This arrangement prevents the finer media from clogging up too quickly, which would reduce the filter’s overall flow and efficiency. By removing solid waste before it has a chance to decay, mechanical filtration serves as the crucial first line of defence, making the subsequent stages of filtration far more effective.
Pillar 2: Biological Filtration (The Powerhouse).
While mechanical filtration makes the water look clean, biological filtration is what makes it safe for fish to live in. This is, without question, the most vital and non-negotiable aspect of keeping an aquarium. The purpose of biological filtration is not to physically remove waste, but to harness a natural process to convert invisible, highly toxic chemical waste into a much less harmful substance.
This incredible transformation is carried out by colonies of beneficial, oxygen-loving bacteria. The two main types you will hear about are Nitrosomonas and Nitrospira. These microscopic organisms are the true powerhouses of your aquarium. They require a stable surface to colonise and a constant flow of oxygenated water to thrive. The primary role of your aquarium filter, beyond trapping debris, is to provide an ideal home for these bacteria. It does this by housing biological filter media—materials with an enormous surface area—and ensuring a steady stream of water passes over them, delivering both oxygen and their “food” in the form of toxic ammonia and nitrite.
Common biological media include porous ceramic rings, sintered glass noodles, plastic bio-balls, and even the very same sponge used for mechanical filtration, which serves a dual purpose. A healthy, mature biological filter is the mark of a stable aquarium and the ultimate goal of any fishkeeper.
Pillar 3: Chemical Filtration (The Specialist).
Chemical filtration is an optional but often very useful stage that acts on a molecular level to remove dissolved impurities that mechanical and biological filtration cannot. This process uses special media that adsorb or absorb specific pollutants from the water.
The most common form of chemical media is activated carbon, a highly porous material that effectively traps a wide range of substances. Chemical filtration can be used to solve specific problems, such as removing the tannins that leach from driftwood and give the water a tea-coloured tint, eliminating unpleasant odours, clearing out leftover fish medications after a treatment regimen, or removing chlorine and heavy metals from tap water. Other specialised media, known as resins, can be used to target specific compounds like phosphates or nitrates.
It is important to understand that chemical media has a finite lifespan. Once its pores become saturated with impurities, it is no longer effective and must be replaced, typically every few weeks. Furthermore, because it removes substances indiscriminately, activated carbon can also pull essential plant fertilisers from the water, so it should be used with caution in planted aquariums.
The Critical Order of Operations.
The sequence in which water passes through these three stages of filtration is not arbitrary; it is crucial for optimal performance. The universally accepted and most effective order is: Mechanical, then Biological, and finally Chemical.
The logic behind this sequence is simple and robust. Mechanical filtration must come first to screen out all the solid debris. If this debris were allowed to reach the biological and chemical media, it would quickly clog the microscopic pores of these materials. This would starve the beneficial bacteria of oxygen and prevent the chemical media from adsorbing dissolved impurities, rendering both stages ineffective. By placing mechanical filtration first, you ensure that the water reaching the biological and chemical stages is as clean as possible, allowing them to function at peak efficiency. This hierarchy, where mechanical and chemical filtration serve to support the all-important biological filter, is a foundational concept. Your primary goal in choosing and maintaining a filter is to cultivate and protect the living ecosystem of beneficial bacteria within it.
The Unseen Engine: A Beginner’s Guide to the Nitrogen Cycle.
To truly appreciate the role of your filter, one must understand the single most important biological process occurring within the aquarium: the nitrogen cycle. This may sound like a daunting topic from a chemistry textbook, but in reality, it is a simple and elegant sequence of events. Grasping this cycle is the key that unlocks the door to successful, long-term fishkeeping.
Why Your Fish Don’t Live in a Toilet.
The fundamental challenge of an aquarium is that it is a closed system. Unlike animals on land, whose waste is dispersed into the wider environment, fish are forced to live in the same water into which they excrete waste. This waste, along with uneaten food and decaying plant matter, immediately begins to decompose and release a chemical compound called ammonia (NH3). Ammonia is extremely toxic to fish. Even at low concentrations, it can burn their gills and skin, causing immense stress, making them susceptible to disease, and ultimately leading to death. Without a process to deal with this constant production of ammonia, an aquarium would quickly become uninhabitable.
The Three-Step Process.
Fortunately, nature has provided a solution in the form of the beneficial bacteria discussed earlier. These bacteria facilitate the nitrogen cycle, a three-step process that converts deadly ammonia into a much safer compound.
- Step 1: Ammonia (NH3) Production (The Toxin): This is the starting point. All organic waste in the tank produces ammonia. In a new aquarium, ammonia levels will begin to rise as soon as fish are added.
- Step 2: Conversion to Nitrite (NO2–) (The Intermediate Toxin): The first group of beneficial bacteria, primarily of the genus Nitrosomonas, establishes itself in the aquarium. These bacteria consume ammonia as their primary food source. In doing so, they convert it into a different compound called nitrite (NO2–). While this is a crucial step, nitrite is also highly toxic to fish.
- Step 3: Conversion to Nitrate (NO3–) (The Final Product): Following the rise in nitrite, a second group of beneficial bacteria, primarily of the genus Nitrospira, begins to colonize. These bacteria consume nitrite and convert it into nitrate (NO3–). Nitrate is the final product of this cycle and is significantly less toxic to fish. Most freshwater fish can tolerate nitrate at much higher concentrations without ill effects.
What Happens to the Nitrate?
In a natural lake or river, nitrate would be readily consumed by an abundance of plant life or processed further by other bacteria. In our closed aquarium system, however, nitrate has nowhere to go and will steadily accumulate over time. While far less dangerous than ammonia or nitrite, very high levels of nitrate (generally above 40-50 parts per million, or ppm) can still cause stress to fish and fuel unsightly algae growth.
This accumulation is the single most important reason why we perform regular partial water changes. By physically removing a portion of the old, nitrate-rich water and replacing it with fresh, clean water, we dilute the concentration of nitrates and keep them at a safe level for our fish. Additionally, adding live aquatic plants to your aquarium can be a great help, as they actively consume nitrates as a fertiliser, acting as a natural, supplementary form of filtration.
“Cycling a Tank”: What Does it Mean?
When you hear experienced hobbyists talk about “cycling a tank,” they are referring to this entire process of establishing robust colonies of Nitrosomonas and Nitrospira bacteria in a new aquarium. This process is not instantaneous; it requires patience and can take anywhere from four to eight weeks to complete fully. It involves setting up the tank and filter and providing a source of ammonia to kick-start the bacterial growth. This can be done by adding a few hardy fish (a “fish-in cycle,” which is stressful for the fish and not recommended) or, more humanely, by adding an ammonia source without fish, such as a pinch of fish food every day or pure ammonia (a “fishless cycle”).
During this period, the filter is not just a piece of plastic and sponge; it is being cultivated into a living ecosystem. The beneficial bacteria will colonise all surfaces of the tank, including the gravel and decorations, but the filter media, with its vast surface area and constant flow of oxygenated water, will become the most densely populated and efficient hub of biological activity. The filter, therefore, is not the source of the biological filtration, but rather the ideal environment for it. Your job as an aquarist is to provide this prime real estate and maintain it properly, allowing nature’s microscopic cleanup crew to do its vital work.
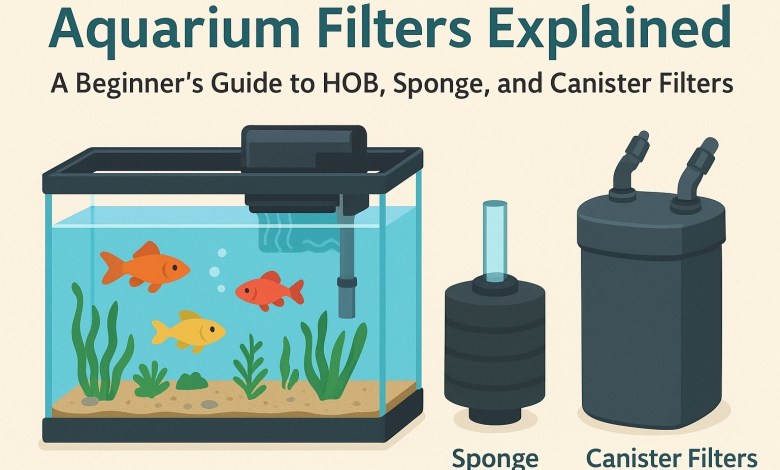
A Detailed Comparison of Aquarium Filter Types.
Now that the foundational principles of filtration are clear, we can delve into the practical matter of choosing a filter. For a beginner setting up a standard 10 to 20-gallon (approximately 38 to 75-litre) tank, the choice typically narrows down to three main types: the Hang-on-Back (HOB) filter, the Sponge filter, and the Canister filter. Each has a distinct design, a unique set of strengths, and specific drawbacks.
3.1 The Hang-on-Back (HOB) Filter: The People’s Choice.
The Hang-on-Back, or HOB, filter is arguably the most popular and commonly recommended type of filter for beginner and intermediate aquarists around the world. It represents a fantastic balance of performance, ease of use, and affordability, making it a versatile all-rounder.
How It Works.
The design is elegantly simple. As the name implies, the main body of the filter hangs on the outside of the back aquarium wall. An intake tube, often adjustable in length, extends down into the tank. A small, integrated motor draws water up this tube and into the filter box. Inside the box, the water is forced to pass through a series of filter media before spilling back into the aquarium, usually in a gentle cascade that resembles a small waterfall. This waterfall effect is not just for aesthetics; it creates surface agitation, which is crucial for promoting gas exchange, releasing carbon dioxide, and oxygenating the water.
The Good Stuff (Pros).
- Ease of Use & Maintenance: For a beginner, this is perhaps the HOB’s greatest strength. Installation is as simple as hanging it on the tank rim and plugging it in. Because the main unit is outside the aquarium, accessing the filter media for cleaning is incredibly convenient and requires minimal disturbance to the tank’s inhabitants.
- Excellent Filtration Balance: HOB filters are designed from the ground up to provide all three stages of filtration. They typically have space for a sponge (mechanical), a compartment for biological media like ceramic rings, and often come with a cartridge containing activated carbon (chemical). They are particularly effective at mechanical filtration, efficiently removing floating debris and keeping the water visibly clear and polished.
- Highly Customisable: This is a key feature that separates good HOBs from basic ones. Many models allow you to move beyond the manufacturer’s pre-packaged cartridges. You can customise the media chamber with your own choice of high-quality sponges, bags of ceramic bio-rings, or other specialised media to significantly boost filtration performance.
- Affordable: HOB filters offer exceptional value for money. A reliable HOB filter suitable for a 10-20 gallon tank can be found in a price range of approximately $15 to $40, depending on the brand and features.
- Adjustable Flow Rate: Many modern HOB filters include a knob or lever to adjust the water flow rate. This is an excellent feature, as it allows you to reduce the current for fish that prefer calmer waters, such as Bettas or Gouramis, or increase it for fish that enjoy more movement.
Things to Consider (Cons).
- The Waterfall Effect: While beneficial for aeration, the sound of splashing water can be bothersome to some, especially if the aquarium is in a quiet room like a bedroom. This noise can be almost entirely eliminated by maintaining a high water level in the tank, so the filter’s output is close to or below the surface.
- Priming Issues: After a power outage, some HOB models may not restart automatically if the water level in the filter box has dropped. This is because the motor cannot draw water up the intake tube without being submerged, a process called “priming.” This can lead to the motor running dry and potentially burning out. It is worth looking for models that are advertised as “self-priming”.
- Intake Hazard: The intake strainer has slots that are large enough to trap or injure very small fish, fry, or ornamental shrimp. This is a common issue with many filter types and is easily and cheaply remedied by fitting a coarse pre-filter sponge over the intake tube. This not only protects your tank’s inhabitants but also adds extra surface area for biological filtration and prevents the main filter from clogging as quickly.
Best For.
The HOB filter is the ideal choice for the quintessential beginner aquarist setting up a small to medium-sized community tank (10 to 50 gallons). It provides a robust, balanced, and highly effective filtration system that is straightforward to install and exceptionally easy to maintain.
3.2 The Sponge Filter: The Humble Powerhouse.
Do not be deceived by its simple appearance. The sponge filter is a classic for a reason and is revered by breeders and long-time hobbyists for its reliability, efficiency, and unbeatable value. It is a specialised tool that, in certain situations, is the undisputed best option available.
How It Works.
The mechanism of a sponge filter is a masterclass in simplicity, relying on basic physics. The system consists of three separate components: the sponge filter unit itself (a weighted base with a porous sponge and a plastic lift tube), an air pump that sits outside the tank, and a length of flexible airline tubing to connect the two. The air pump pushes air through the tubing and into the base of the lift tube inside the sponge. As the air bubbles rise up the tube, they displace water, creating a gentle but constant suction. This suction draws water from the surrounding tank through the porous sponge, trapping debris and providing a perfect habitat for beneficial bacteria.
The Good Stuff (Pros).
- Unbeatable for Biological Filtration: The entire volume of the sponge is a porous, three-dimensional structure with an immense surface area. This makes it an exceptionally effective biological filter, capable of hosting a massive colony of nitrifying bacteria.
- Extremely Safe: Because it has no motor and a very gentle, diffuse intake, the sponge filter is the safest possible option for delicate aquarium inhabitants. There is no risk of tiny baby fish (fry), ornamental shrimp, or long-finned fish like Bettas being sucked into a powerful intake.
- Incredibly Affordable: This is the most budget-friendly filtration method by a significant margin. A good quality sponge filter can be purchased for as little as $5 to $15, with a small, quiet air pump costing a bit more.
- Reliable & Power-Outage Proof: With no moving mechanical parts to break down, a sponge filter is virtually indestructible. Its resilience during a power outage is a major advantage. The bacterial colony remains submerged in the oxygenated tank water, giving it a much better chance of survival. Furthermore, it can be easily connected to a small, inexpensive battery-operated air pump, ensuring continuous filtration and aeration even during extended power cuts.
- Provides Aeration: The rising column of bubbles not only powers the filter but also aerates the water, increasing dissolved oxygen levels for your fish.
Things to Consider (Cons).
- Aesthetics: The most significant drawback of a sponge filter is its appearance. It is a functional piece of equipment that sits inside the tank and can be bulky and difficult to hide, potentially detracting from a carefully planned aquascape.
- Limited Mechanical Filtration: While the sponge will trap larger pieces of debris, it is not very effective at removing fine particles. This can result in water that is biologically safe but may not have the crystal-clear, “polished” look that a HOB filter can achieve.
- No Chemical Filtration: The standard design has no provision for adding chemical media like activated carbon. While some newer, more complex models include small compartments for this, it is not a primary feature.
- Requires an Air Pump: The need for an external air pump is an additional purchase and can be a source of a constant, low-level humming noise, which may be a consideration for some setups.
Best For.
The sponge filter is the superior choice for specialised tanks, including breeding setups, fry-rearing tanks, shrimp colonies, and hospital or quarantine tanks. It is also an excellent option for aquarists on a strict budget who prioritise biological stability and reliability above all else.
3.3 The Canister Filter: The Heavy-Duty Professional.
If the HOB is the versatile family car and the sponge filter is the reliable workhorse, the canister filter is the high-performance sports car of the aquarium world. It is a powerful, sophisticated piece of equipment designed for demanding situations, and for a beginner’s 10-20 gallon tank, it is generally considered unnecessary and overly complex.
How It Works.
A canister filter is an external filtration system. The main unit is a large, sealed canister that is typically placed in the cabinet underneath the aquarium. A motor inside the canister pulls water from the tank through an intake hose, forces it through a series of stacked media trays inside the pressurised canister, and then pumps the clean water back into the tank via an outlet hose, often through a spray bar to distribute the flow.
The Good Stuff (Pros).
- Superior Filtration Power: The sheer size of a canister filter allows it to hold a massive volume and variety of filter media. This gives it an unparalleled capacity for mechanical, biological, and chemical filtration, far exceeding that of a HOB or sponge filter.
- Excellent for Large Tanks: This high capacity makes them the best choice for larger aquariums (typically 40 gallons and up) or tanks with a heavy “bioload”—meaning they house many large or messy fish that produce a lot of waste.
- Very Quiet Operation: Because the motor and all water movement are contained within a sealed unit hidden away in a cabinet, canister filters are virtually silent during operation.
- Aesthetically Pleasing: The only equipment visible inside the aquarium are the discreet intake and outlet pipes (often called lily pipes in the aquascaping hobby). This allows for a very clean, uncluttered, and natural-looking display.
Things to Consider (Cons).
- High Cost: Canister filters are the most expensive of the three types by a wide margin. A small canister filter suitable for a 20-gallon tank from a reputable brand like Fluval or Eheim could cost anywhere from $80 to $150 or more.
- Complex Maintenance: While maintenance is required less frequently (perhaps every 1 to 4 months), it is a significantly more involved process. It requires shutting off valves, disconnecting heavy, water-filled hoses, carrying the canister to a sink, opening it up, and cleaning multiple individual media trays. It can be a messy and time-consuming task.
- Potential for Leaks: As a sealed, external system with multiple O-rings and hose connections, there is an inherent, albeit small, risk of a leak developing. If a seal fails, a canister filter can potentially siphon a large volume of water from the tank onto the floor, leading to significant damage.
- Overkill for Beginners: For a standard 10-20 gallon tank, the immense filtration power of a canister filter is simply not necessary. The strong flow can be stressful for small fish, and the high cost and maintenance complexity are not justified for a simple beginner setup.
Best For.
Canister filters are best suited for experienced hobbyists with large aquariums, heavily stocked tanks (like those for large Cichlids), or specialised setups such as high-tech planted aquascapes, where their power and features can be fully utilised.
A critical piece of advice for any beginner, especially those opting for a HOB filter, concerns the common “cartridge trap.” Many entry-level HOB filters are sold with disposable cartridges, which typically contain a small amount of filter floss and some activated carbon. The manufacturer’s instructions often advise replacing this cartridge every month. This business model creates a recurring source of revenue for the company, but it is disastrous for the health of the aquarium. The most valuable component of that filter cartridge is the colony of beneficial bacteria living on the floss. By throwing the entire cartridge away, you are discarding your entire biological filter.
This can cause the nitrogen cycle to crash, leading to a sudden, dangerous spike in ammonia and nitrite that can harm or kill your fish. A far better practice is to either purchase a HOB filter that uses permanent, separate media components (like the popular AquaClear series) or to modify a cartridge-based filter. You can do this by cutting open the cartridge, discarding the carbon after a few weeks (as it becomes exhausted), and continuing to use the floss indefinitely. An even better solution is to discard the plastic cartridge frame entirely and fill the media chamber with a cut-to-fit block of sponge and a mesh bag of high-quality ceramic bio-media. This one-time investment creates a permanent, superior biological filter that should never be thrown away.
HOB vs. Sponge vs. Canister.
To simplify the decision-making process, the detailed analysis of each filter type is summarised in the comparison table below. This allows for a quick, side-by-side evaluation of the key factors a beginner should consider.
| Feature | Hang-on-Back (HOB) Filter | Sponge Filter | Canister Filter |
|---|---|---|---|
| Filtration Type | Excellent Mechanical, Good Biological, Good Chemical | Excellent Biological, Fair Mechanical, No Chemical | Superior Mechanical, Biological, & Chemical |
| Placement | Hangs on the back of the tank, mostly external | Fully internal, sits on the substrate | Fully external, usually in a cabinet below the tank |
| Ease of Use | Very easy to install and access for maintenance | Very easy to set up, requires an air pump | More complex installation and priming process |
| Maintenance | Easy and frequent (every 2-4 weeks) | Easy, but can be messy (every 2-4 weeks) | Difficult and infrequent (every 1-4 months) |
| Cost (Initial) | Affordable ($15 – $40) | Very Cheap ($5 – $15 + Air Pump) | Expensive ($80+) |
| Noise Level | Low to moderate (waterfall sound) | Low (air pump hum and bubbling) | Very quiet / silent |
| Safety for Fry/Shrimp | Requires a pre-filter sponge on the intake | Excellent, the safest option | Generally safe, but intake can be strong |
| Aesthetics | Visible intake tube, external box | Bulky and visible inside the tank | Very clean look, only pipes are visible |
| Ideal for 10-20 Gallons? | Yes, excellent choice | Yes, excellent for specific uses or budget | No, generally overkill and too complex |
The Best Aquarium Filter for a Beginner’s 10-20 Gallon Tank.
After a thorough examination of the principles of filtration and the specific characteristics of each filter type, we can now provide a clear and confident recommendation for the beginner aquarist setting up their first 10 to 20-gallon aquarium.
First, let us decisively eliminate the canister filter from consideration for this specific scenario. While it is a superb piece of technology, its high cost, complex maintenance, and powerful flow rate make it entirely inappropriate and unnecessary for a small beginner tank. It is a filtration solution for a future upgrade, perhaps when you venture into a much larger aquarium, but it is not the right place to start.
This leaves a head-to-head contest between the Hang-on-Back filter and the Sponge filter. The choice between these two excellent options depends on your specific priorities and the type of aquarium you envision.
The Top Recommendation: The Hang-on-Back (HOB) Filter.
For the vast majority of beginners starting a standard community tank with fish like guppies, tetras, or mollies, the Hang-on-Back (HOB) filter is the best all-around choice.
It strikes the perfect balance between all the critical factors. It provides robust three-stage filtration, with particularly strong mechanical filtration that will keep your water looking crystal clear. It is exceptionally easy to install and maintain, a crucial factor for someone new to the hobby who is already learning about water changes and fish care. HOBs are affordable and widely available from brands like AquaClear, Fluval, Marineland, and Aqueon from online retailers and in local fish stores. Finally, the ability to customise the filter media offers a clear upgrade path, allowing a beginner to enhance their filtration as they gain more experience.
The Excellent Alternative: The Sponge Filter.
While the HOB is the best generalist, the Sponge filter is a fantastic, and in some cases superior, alternative. A beginner should choose a sponge filter over a HOB filter in the following specific situations:
- If budget is the absolute top priority: A complete sponge filter setup is the most economical way to provide excellent filtration.
- If the tank will house delicate inhabitants: For a tank dedicated to ornamental shrimp, a long-finned Betta fish, or for breeding and raising fry, the gentle flow of a sponge filter makes it the safest and most appropriate choice.
- If simplicity and reliability are paramount: With no moving parts to fail, a sponge filter offers peace of mind and is incredibly resilient, especially when paired with a battery backup air pump.
The primary trade-offs are its in-tank appearance and its weaker mechanical filtration capabilities, which may not satisfy those who desire perfectly polished water.
The “Best of Both Worlds” Strategy.
For the enthusiastic beginner who wants to ensure the best possible conditions and build in redundancy, a highly effective strategy is to use both a HOB filter and a sponge filter in the same aquarium. This combination provides numerous benefits: it pairs the superior mechanical filtration of the HOB with the massive biological capacity of the sponge filter; it creates redundancy, so if one filter fails or is being cleaned, the other maintains the tank’s cycle; and it provides you with a fully established, “seeded” sponge filter that can be moved instantly to set up a quarantine or hospital tank if a fish gets sick.
Ultimately, the best recommendation is not a single product but a framework for decision-making. For a balanced, easy-to-manage start, choose the HOB. For a specialised, safe, or budget-conscious setup, choose the sponge filter. For the ultimate in stability and preparedness, consider using both.
Keeping Your Filter (and its Bacteria) Healthy.
The final piece of the puzzle is proper filter maintenance. Many beginners, fearing they will “do it wrong,” either neglect this crucial task or overdo it, with disastrous consequences. The key is to shift your mindset: you are not sanitising a piece of equipment; you are gardening a living bacterial colony.
Never Use Tap Water!
This is the most critical rule of filter maintenance. The tap water in our homes contains chlorine or chloramine, chemicals added specifically to kill bacteria. If you wash your filter media under the tap, you will annihilate the beneficial bacterial colony you have spent weeks cultivating, effectively resetting your tank’s nitrogen cycle and causing a dangerous ammonia spike.
A Step-by-Step Guide.
The proper way to clean your filter media is simple, safe, and effective.
- During your routine weekly or bi-weekly water change, siphon about a gallon or two of the old tank water into a clean bucket that has never been used with soaps or detergents.
- Unplug the filter to turn it off.
- Remove the filter media (the sponges, ceramic rings, etc.) from the filter housing.
- Submerge the media in the bucket of old tank water and gently swish it around and squeeze the sponges a few times.
- The goal is not to make the media look brand new. The brown “gunk” or biofilm you see is not just dirt; it is the heart of your bacterial colony. You are simply trying to dislodge the excess, loose debris that is clogging the pores and impeding water flow.
- Once the flow path is clear, reassemble the filter and turn it back on as promptly as possible. The beneficial bacteria are aerobic, meaning they need oxygen, and they can begin to die off if left without water flow for an extended period.
How Often Should You Clean Your Filter?
There is no fixed schedule. The best indicator that your filter needs cleaning is when you observe a noticeable decrease in the rate of water flow from the filter’s outlet. For a HOB on a moderately stocked 20-gallon tank, this might be once every 3-4 weeks. For a sponge filter, it may be similar. It is also wise to avoid cleaning your filter on the same day you perform a major substrate vacuuming or water change, as this can disrupt the aquarium’s stability too much at once.
Replacing Media.
Remember the “cartridge trap.” Your primary filter media—sponges and ceramic rings—are permanent fixtures. They should last for many years and should never be replaced unless they are physically disintegrating. If you absolutely must replace a piece of media, do it in stages. For instance, if your filter contains two sponges, replace only one. Wait at least a month for bacteria from the old sponge to colonise the new one before considering replacing the second. This staggered approach preserves the integrity of your biological filter. By understanding that your filter is a living ecosystem and treating it with care, you will ensure the long-term health and stability of your aquarium and the well-being of its inhabitants.
Disclaimer: This article is intended for informational and educational purposes only. The information provided is based on general knowledge and experience in the aquarium hobby. It is not a substitute for professional veterinary or aquatic specialist advice. Every aquarium is a unique ecosystem, and the specific needs of your aquatic pets may vary. The author and publisher of this article are not responsible for any outcomes, positive or negative, that result from following the advice provided herein. Always conduct your own research and consult with a professional when in doubt. By reading this article, you agree that you are solely responsible for the health and well-being of your aquarium and its inhabitants.


